
What is a webhook and how to use one
Feb 2, 2022
At some point, you've probably seen the term webhooks written in the documentation or as a field for third-party application integration. It's not an API but acts sort of like one - well, half of one.
This sounds a bit enigmatic - which leads to the question: what is a webhook?
What is a webhook?
In its simplest form, a webhook is a one-way interface to another application. For a webhook to work, it needs a trigger event that allows it to share data to a set destination.
A webhook can be seen as a type of API that's event-driven rather than based on requests. Instead of an application making a direct request to the API endpoint, something happens to trigger the webhook. The webhook then triggers the destination API.
Webhooks are often used to bridge third-party applications to another source. It acts as an intermediary between the trigger and the destination source.
Let's look at UseCSV as an example.
UseCSV utilizes webhooks to connect your frontend to a CSV import functionality. When a user imports data, the service takes the data, transforms it into easy to use JSON, and then sends it to the specified endpoint.
Below is a quick tutorial demonstrating how a webhook works with a React frontend and Deno backend.
Quick tutorial: using UseCSV webhook with Cloudflare tunnel and Deno backend
In this tutorial, we will be integrating UseCSV to import some CSV data from a React frontend. This data will make its way to our Deno backend to be stored in an object array. A free Cloudflare tunnel will be used to connect useCSV to our localhost endpoint.
Here is a diagram of the data flow and where our webhook will sit in the pipeline.

Setting up your Deno backend
Deno is a lightweight JavaScript-based runtime made by the same guy that made node.js. In a way, it can be seen as node.js' little brother with all the lessons learned packed into it. In summary, Deno is a simple, modern, and secure runtime for JavaScript and TypeScript that's built in Rust.
For this tutorial, we will be setting up a basic and barebones API backend that will receive GET and POST requests.
To install Deno, you can do so using Shell (Mac, Linux) or PowerShell (Windows).
Shell (Mac, Linux):
$ curl -fsSL https://deno.land/install.sh | sh
PowerShell (Windows):
$ iwr https://deno.land/install.ps1 -useb | iex
For other installation options, you can find them here on Deno's installation section.
Once set up, create a new folder to hold your Deno code. We will have three files in total and they are:
app.ts- this will act as the entry into our app and set up the
localhostserver.
- this will act as the entry into our app and set up the
routes.ts- routes will set up our API endpoints and attach the associated API logic located in the controller to it.
controller.ts- the controller will contain our API logic and what to do with the incoming requests. Here, we will support processing for
GETandPOSTrequests.
- the controller will contain our API logic and what to do with the incoming requests. Here, we will support processing for
Here is the code for app.ts:
import { Application } from "https://deno.land/x/oak/mod.ts"; import router from "./routes.ts"; const HOST = "127.0.0.1"; const PORT = 8080; const app = new Application(); app.use(router.routes()); app.use(router.allowedMethods()); console.log(`Listening on port ${PORT} ...`); await app.listen(`${HOST}:${PORT}`);
Deno doesn't require package installation. Instead, it will download and cache the necessary packages when it first loads. This means that you only need to directly link in the package source in your code once and it eliminates the need for a package.json file and npm installation commands.
Here is the code for routes.ts:
import { Router } from "https://deno.land/x/oak/mod.ts"; import { getUsers, addUsers } from "./controller.ts"; const router = new Router(); router.get("/users", getUsers).post("/users", addUsers); export default router;
Here is the code for controller.ts:
interface IUsers { first_name: string; last_name: string; twitter: string; } let users: Array<IUsers> = [ { first_name: "Layercode", last_name: "Devs", twitter: "layercodeDevs", }, { first_name: "Damien", last_name: "Tanner", twitter: "dctanner", }, ]; const getUsers = ({ response }: { response: any }) => { response.body = users; }; const addUsers = async ({ request, response, }: { request: any; response: any; }) => { if (!request.body()) { response.status = 400; response.body = { success: false, msg: "The request must have a body", }; return; } const content = await request.body().value; const rows = content.rows; rows.forEach((singleEntry: IUsers) => users.push(singleEntry)); response.body = { message: "users have been added successfully" }; response.status = 200; }; export { getUsers, addUsers };
In the code above, there are two async functions - getUsers and addUsers. When a POST request is received, addUsers will be invoked through the route /users. The async function addUsers takes the request body's value and then processes it before sending a 200 success response.
getUsers is the other async function. This is so that we can test if the data is properly received and added to our users array.
That's basically it for our Deno backend. To run Deno, open up your console and run the following command:
Deno run --allow-net app.ts
Your Deno endpoint is now available at localhost:8080. You can test it out by using a REST API client and running a GET request on localhost:8080/users.
Setting up your React frontend with UseCSV
Create a new React app using the following command:
npx create-react-app usecsv-example
Navigate into the folder using cd usecsv-example. Install UseCSV importer plugin. Here are the commands:
Using NPM
npm install @usecsv/react
Using YARN
yarn add @usecsv/react
In your App.js file, replace the code with the following:
import UseCSV from "@usecsv/react"; function App() { return ( <div className="App"> <h1>Start importing your data</h1> <UseCSV importerKey="<your importer key here>"> Import Data </UseCSV> </div> ); } export default App;
Here is a quick overview of the props that UseCSV takes:
importerKey- this is astringvalue that connects your frontend code to the importer. You can store this as an.envvalue that can later be swapped out or wrapped around security protocols. You can find this key in the admin panel of your importer.user- this aJSONobject that can be used to pass in additional information to the webhook, which is then relayed to the backend.
Setting up UseCSV
Visit app.usecsv.com and create your UseCSV account. Click on the Add importer button to create a new importer.

Give your importer a name. In our case, it is "Users".

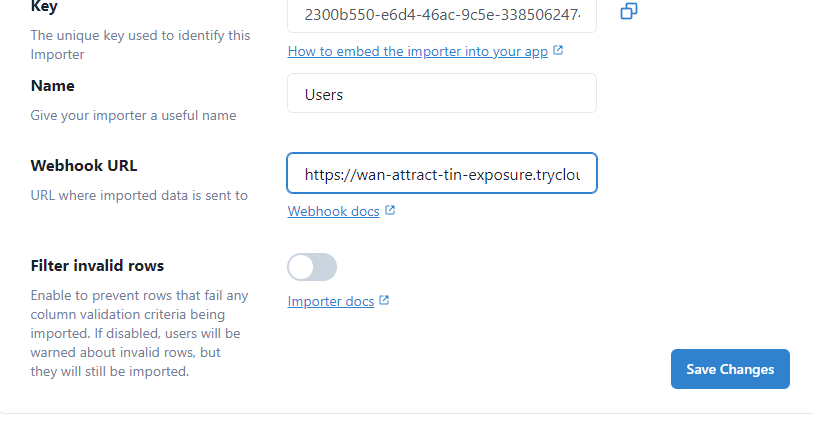
Once you've clicked on Save, the console will take you to the Users importer settings. Here, you can find your Key, edit the name of your importer, and place to put your Webhook URL.
Add the Key value to your React app.
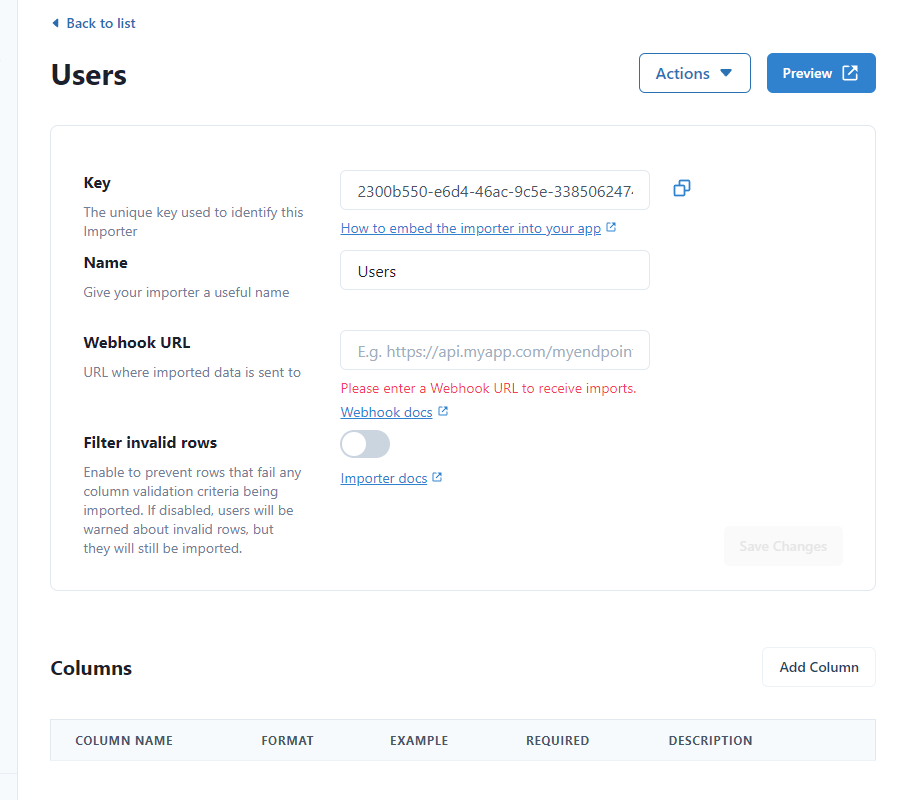
This is also the place where you can configure your columns and view your imports history. For this tutorial, we are going to configure our columns so it matches with our Deno backend Users interface. click on Add Column, fill in the fields and repeat for the other columns.
Here is a screenshot after the setup is completed.


Now that everything is set up, let's move on to creating a free Cloudflare tunnel to act as the temporary API endpoint that will enable us to connect to our Deno localhost:8080.
Setting up and running Cloudflare tunnel to connect UseCSV via webhook to your backend
Cloudflare has a free tunnel service that you can use to connect to your localhost. If you're running on Windows, you can go to the download page and download the executable for your system. Rename the download to cloudflared.exe. Open up Powershell and run the following command:
cloudflared.exe tunnel localhost:8080
For macOS, you can download via brew and run the tunnel using the command above:
brew install cloudflare/cloudflare/cloudflared
For more details on running Cloudflare tunnels on localhost, you can find it here.
Once you run your tunnel command, you will get something like this:
2022-01-29T23:40:16Z INF Thank you for trying Cloudflare Tunnel. Doing so, without a Cloudflare account, is a quick way to experiment and try it out. However, be aware that these account-less Tunnels have no uptime guarantee. If you intend to use Tunnels in production you should use a pre-created named tunnel by following: https://developers.cloudflare.com/cloudflare-one/connections/connect-apps 2022-01-29T23:40:16Z INF Requesting new quick Tunnel on trycloudflare.com... 2022-01-29T23:40:17Z INF +--------------------------------------------------------------------------------------------+ 2022-01-29T23:40:17Z INF | Your quick Tunnel has been created! Visit it at (it may take some time to be reachable): | 2022-01-29T23:40:17Z INF | https://wan-attract-tin-exposure.trycloudflare.com | 2022-01-29T23:40:17Z INF +--------------------------------------------------------------------------------------------+ 2022-01-29T23:40:17Z INF Cannot determine default configuration path. No file [config.yml config.yaml] in [~/.cloudflared ~/.cloudflare-warp ~/cloudflare-warp] 2022-01-29T23:40:17Z INF Version 2022.1.2 2022-01-29T23:40:17Z INF GOOS: windows, GOVersion: go1.17.5, GoArch: amd64 2022-01-29T23:40:17Z INF Settings: map[protocol:quic] 2022-01-29T23:40:17Z INF cloudflared will not automatically update on Windows systems. 2022-01-29T23:40:17Z INF Generated Connector ID: 9d4b898f-ceab-43fa-bab6-bee8f90ef3e2
use the tunnel link as produced by your console as your base URL. For example, since our API route is localhost:8080/users, based on the above output, the API URL tunnel for the webhook is https://wan-attract-tin-exposure.trycloudflare.com/users
Go back to UseCSV console interface and add the link in with the API route.
Now we can start using our UseCSV integration via our React frontend.


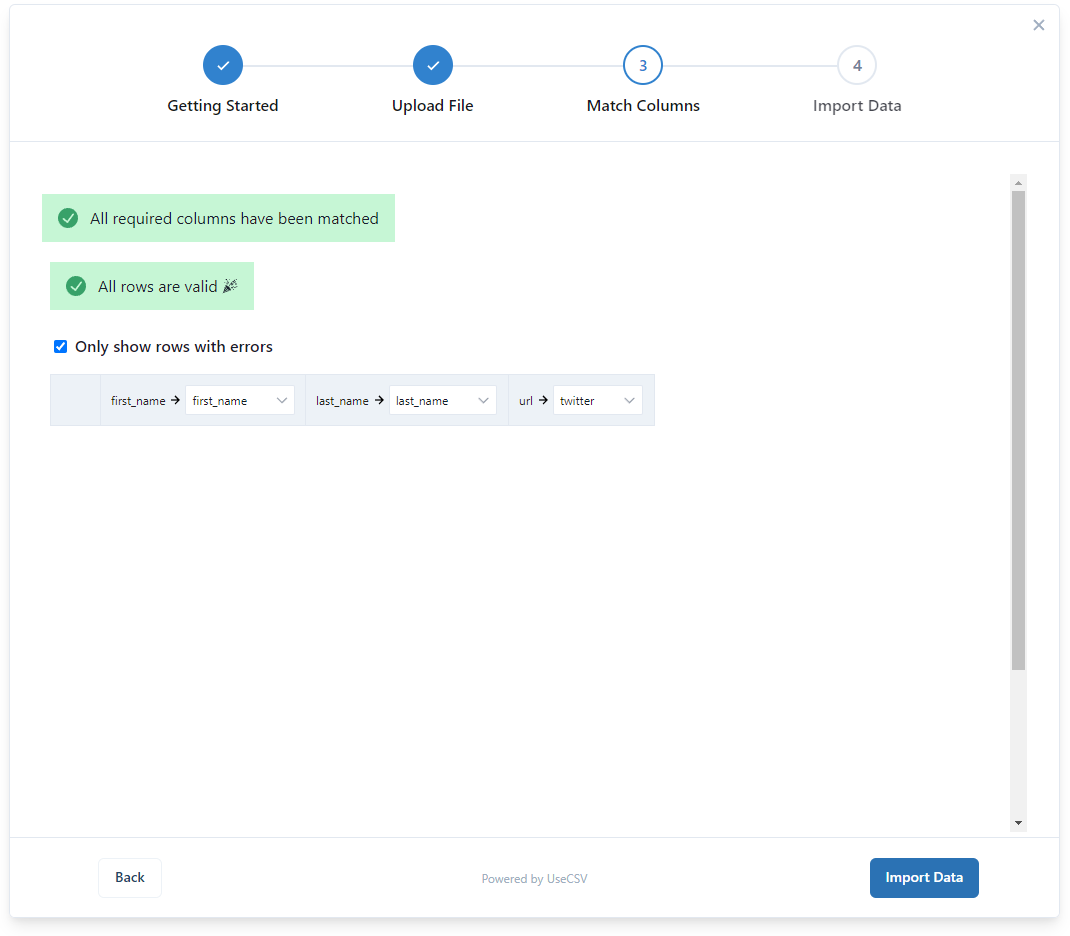
Once completed, the interface will give you the above green success tick.
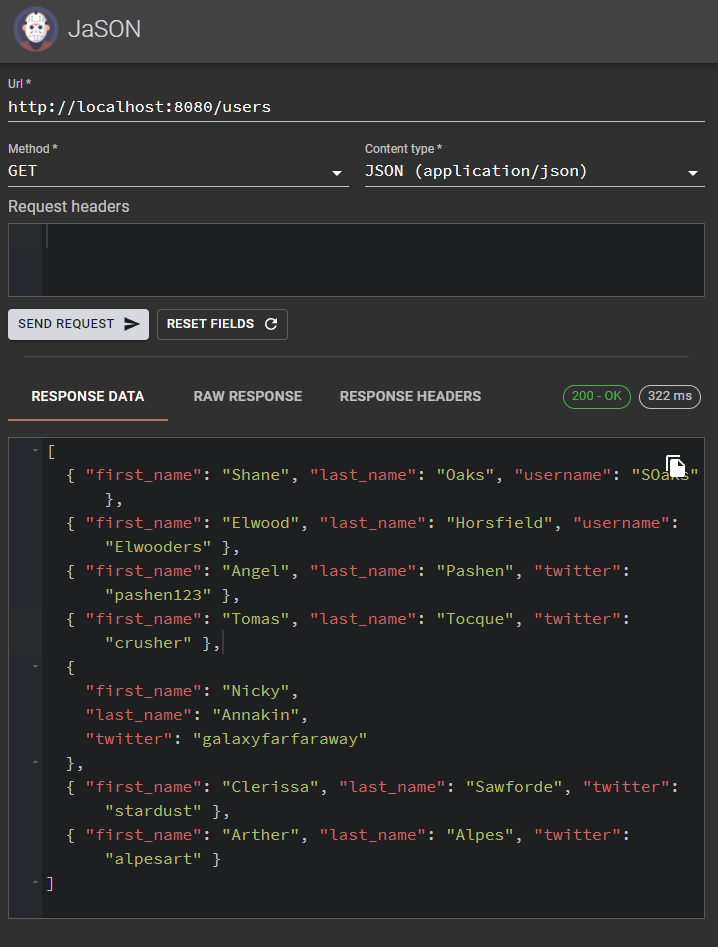
To check that everything worked as expected, we can call our GET route via a REST client. In the screenshot below, JaSON is used to test our GET endpoint and check that the data made it to our backend successfully via UseCSV webhook.
Wrapping Up
You can find the full code repo for the Deno backend portion of the code here. Webhooks are a simple way to connect external apps into your user flow. To ensure that your apps are secure, you will need to put in your own security checks and protocols such as user verification and URL origins.

